House Rental Management System in PHP

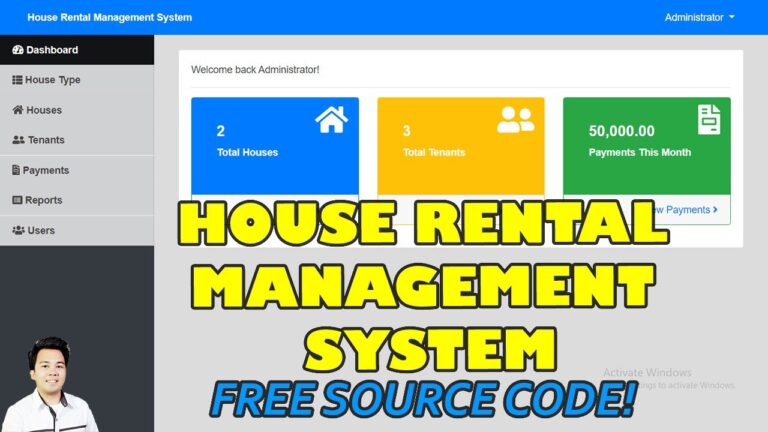
House Rental Management System Project is a simple web application develop in PHP MySQL database using JavaScript, Bootstrap, HTML, CSS, Ajax and Modal. The main purposes of the system is to manage the payment of the tenant and monitor the house rental. The system contain of admin and staff, the admin can manage all information of the tenant like edit, update, delete, and check payment and accept, and the staff can manage like admin but different access.
Features of the Project
- Admin Dashboard
- House type
- Houses
- Tenants
- Payments
- Reports
- Users
Creating a House Rental Management System in PHP involves designing and implementing a system to manage rental properties, tenants, leases, payments, and maintenance requests. Below is a step-by-step guide to help you build this system:
1. Database Design:
- Design your MySQL database schema to store information about properties, tenants, leases, payments, and maintenance requests.
- Create tables for
properties,tenants,leases,payments,maintenance_requests, and establish relationships between them (e.g., a property has multiple leases, a tenant has multiple payments, etc.).
2. Setting Up the Development Environment:
- Set up a local development environment with PHP and MySQL, using tools like XAMPP or MAMP.
- Create a new database and import your database schema using SQL scripts.
3. User Authentication:
- Implement user authentication functionality to allow landlords or property managers to log in securely.
- Use PHP sessions or JSON Web Tokens (JWT) for user authentication and authorization.
4. Property Management:
- Develop functionality for landlords to add, edit, and delete property listings, including details such as address, rent amount, amenities, etc.
- Use PHP scripts to handle form submissions, validate inputs, and interact with the MySQL database to insert or update property records.
5. Tenant Management:
- Implement features for managing tenant records, including adding, editing, and deleting tenant profiles.
- Associate tenants with specific properties and leases in the database to track occupancy.
6. Lease Management:
- Develop functionality for creating and managing leases between landlords and tenants, including lease start/end dates, rent amounts, security deposits, etc.
- Generate lease agreements dynamically based on user inputs and store them securely.
7. Payment Processing:
- Integrate payment gateways to facilitate rent payments from tenants.
- Implement features for tracking rent payments, late fees, security deposits, and other financial transactions.
8. Maintenance Requests:
- Provide functionality for tenants to submit maintenance requests online, including descriptions of issues and priority levels.
- Allow landlords or property managers to track and manage maintenance requests, assign tasks to maintenance staff, and update the status of requests.
9. Reporting and Analytics:
- Develop reporting tools to generate summary reports and analytics on property occupancy, rent payments, maintenance requests, etc.
- Generate dynamic reports using PHP and MySQL queries, and display them in tabular or graphical formats.
10. Testing and Debugging:
- Thoroughly test each feature of your house rental management system to ensure it works as expected. Pay attention to edge cases and error handling scenarios.
- Use tools like PHPUnit for automated testing and debugging tools like Xdebug for troubleshooting.
11. Deployment:
- Deploy your house rental management system to a live web server, ensuring it meets the necessary requirements for PHP and MySQL.
- Secure your application by implementing measures such as HTTPS encryption, input validation, and SQL injection prevention.
By following these steps and considering these tips, you can develop a comprehensive House Rental Management System in PHP that meets the needs of landlords, property managers, and tenants.
How To Run
Above all, to run this project you must have installed a virtual server i.e XAMPP on your PC. House Rental Management System in PHP and MySQL with source code is free to download, Use for educational purposes only!
Follow the following steps after Starting Apache and MySQL in XAMPP:
1st Step: Firstly, Extract the file
2nd Step: After that, Copy the main project folder
3rd Step: So, you need to Paste in xampp/htdocs/
Further, Now Connecting Database
4th Step: So, for now, Open a browser and go to URL “http://localhost/phpmyadmin/”
5th Step: After that, Click on the databases tab
6th Step: So, Create a database naming “house_rental_db” and then click on the import tab
7th Step: Certainly, Click on browse file and select “house_rental_db.sql” file which is inside the “db” folder
8th Step: Meanwhile, click on Go button.
After Creating Database,
9th Step: Moreover, Open a browser and go to URL “http://localhost/house_rental”


